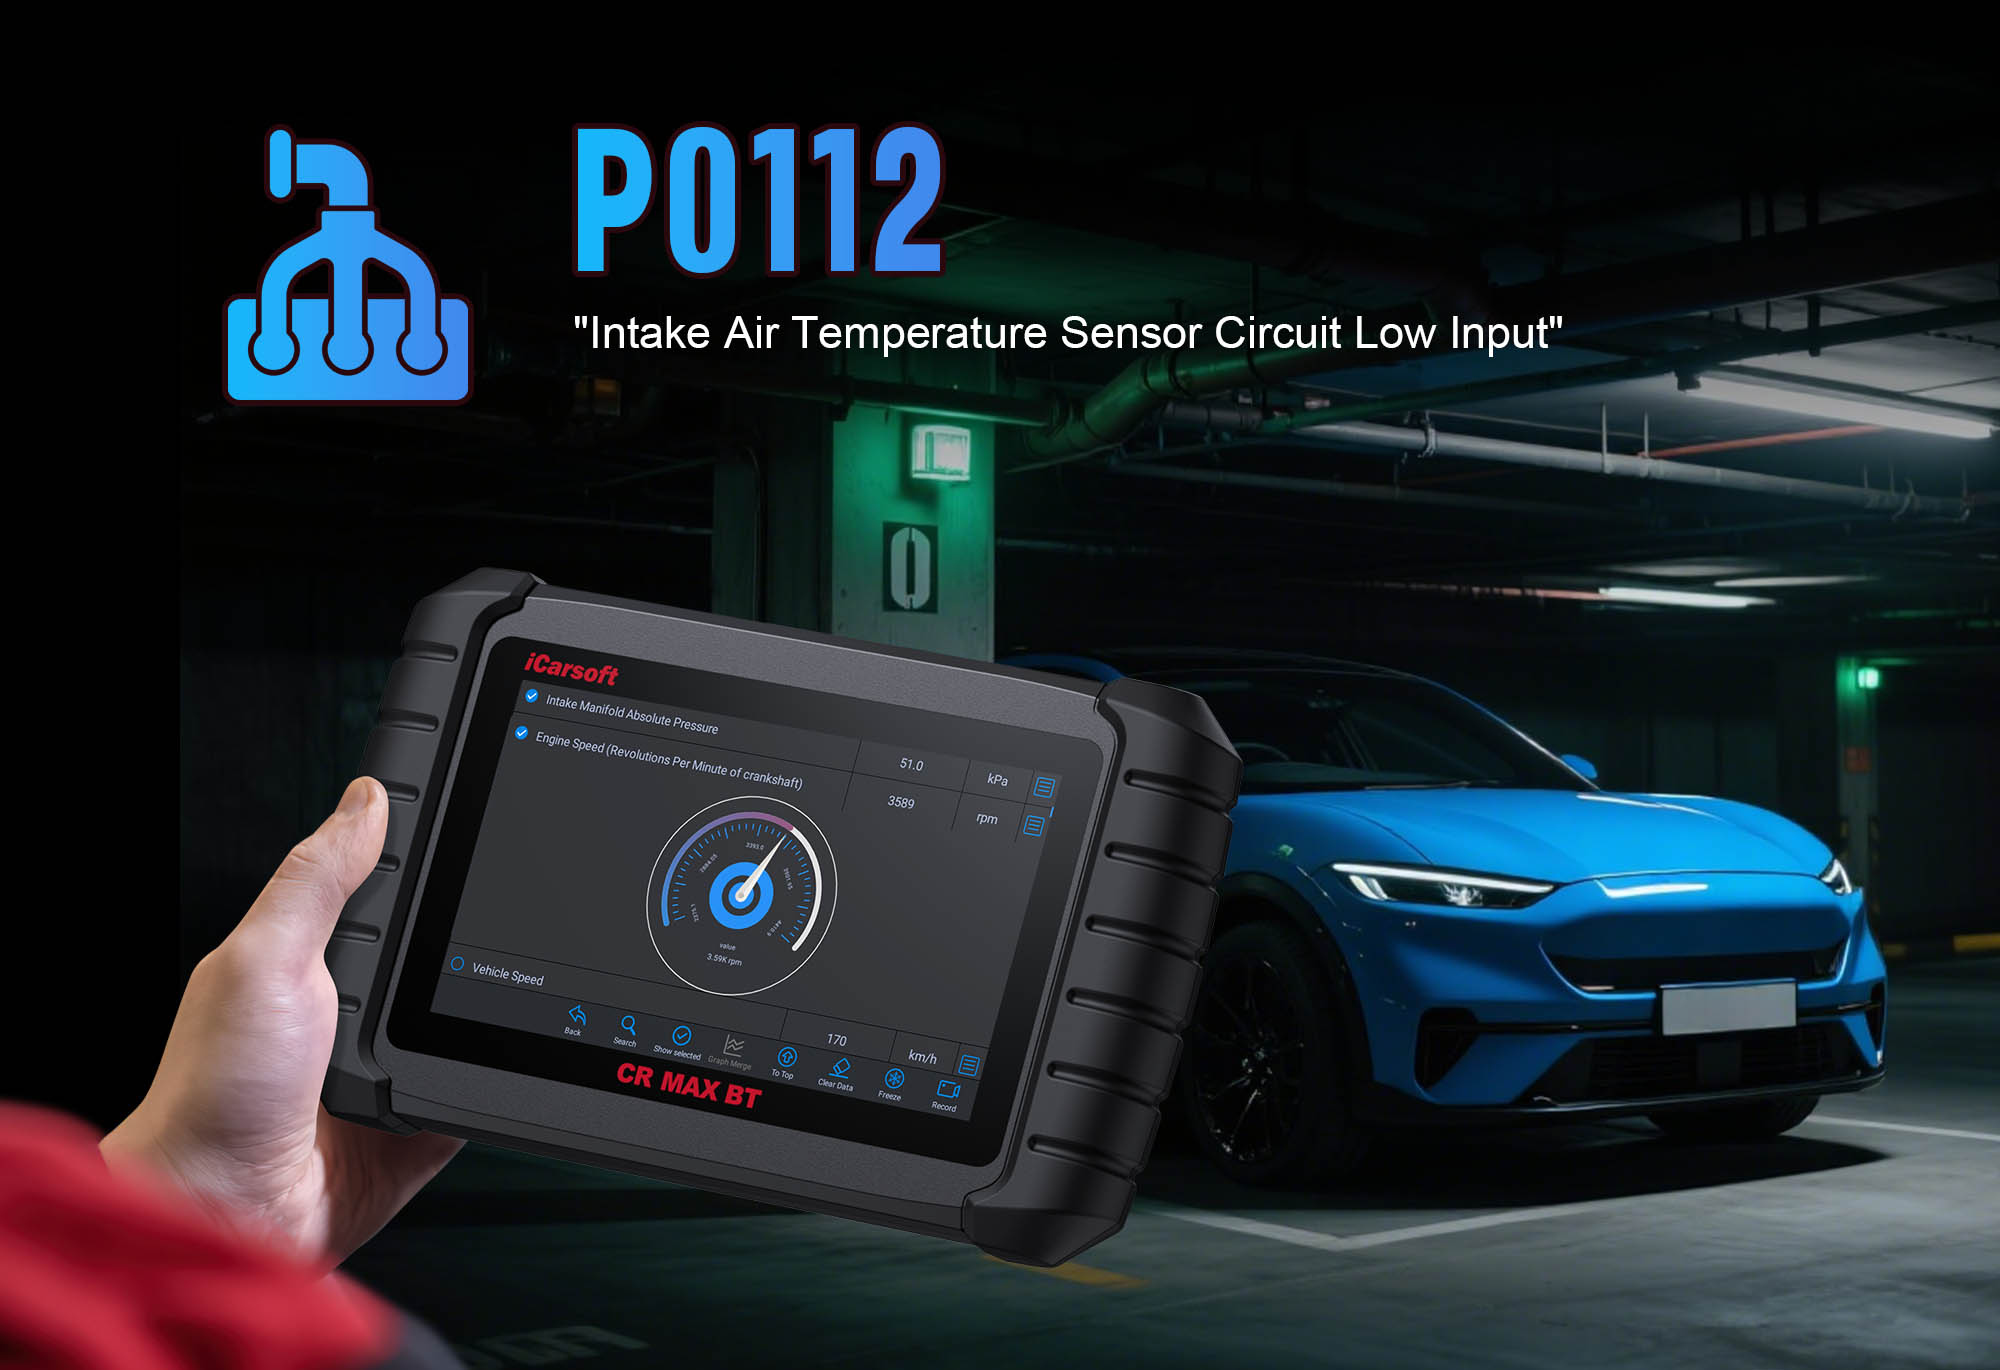
P0112 with iCarsoft CR MAX BT: Fix Intake Air Temperature Sensor Issues
If your check engine light illuminates and a scan reveals P0112, you’re dealing with a problem in your vehicle’s intake air temperature (IAT) sensor circuit. This generic OBD-II code indicates “Intake Air Temperature Sensor Circuit Low Input,” meaning the Engine Control Module (ECM) is receiving an abnormally low voltage signal from the IAT sensor—typically below 0.5V when the engine is running.
The IAT sensor plays a critical role in engine performance: it measures the temperature of air entering the intake manifold, allowing the ECM to adjust fuel injection and ignition timing for optimal combustion. Cold air (dense with oxygen) requires more fuel, while warm air needs less. When P0112 strikes, the ECM receives incorrect temperature data, leading to poor fuel economy, rough idling, hesitation during acceleration, or even difficulty starting in cold weather.
Basic scanners might only confirm “IAT sensor fault” but fail to distinguish between a faulty sensor, damaged wiring, or ECM issue. The iCarsoft CR MAX BT—with its wireless design and advanced sensor diagnostics—changes this. Equipped with Bluetooth connectivity, real-time data monitoring, and vehicle-specific IAT specs, it simplifies diagnosing and clearing P0112. Below is a complete guide to the process.
First: Understand P0112—What It Means & Why It Happens
Effective diagnosis starts with grasping the IAT sensor’s function and the common triggers for P0112. This code isn’t just a “sensor error”—it’s a sign of disrupted data flow between the sensor and ECM.
The IAT Sensor’s Role
Mounted in the air intake system (location varies by vehicle), the IAT sensor uses a thermistor (temperature-sensitive resistor) to measure incoming air temperature. Its operation follows a simple rule:
-
When air temperature is low (e.g., 32°F), the thermistor’s resistance is high, sending a low voltage signal (≈0.5V–1.0V) to the ECM.
-
When air temperature is high (e.g., 100°F), the thermistor’s resistance is low, sending a high voltage signal (≈3.5V–4.5V) to the ECM.
-
The ECM uses this signal to adjust fuel injection: more fuel for cold air, less for warm air—ensuring optimal combustion.
P0112 triggers when the signal stays below 0.5V regardless of temperature—telling the ECM the air is far colder than it actually is (or that the sensor circuit is faulty).
Key Symptoms of P0112
Poor Fuel Economy
The ECM assumes cold, dense air (due to low IAT voltage) and over-fuels the engine. You’ll notice 10–20% lower mileage—e.g., a 30 MPG vehicle drops to 24–27 MPG.
Rough Idle or Misfires
The over-rich fuel mixture (from false “cold air” readings) causes incomplete combustion. The engine shakes at idle, and you may feel subtle misfires during low-speed driving.
Acceleration Hesitation
When you press the gas, the ECM struggles to adjust fuel delivery quickly. The vehicle hesitates for 1–2 seconds before accelerating—common in both city and highway driving.
Cold Start Issues
Ironically, P0112 can make cold starts harder: the ECM already thinks the air is frigid and may not enrich the mixture enough for smooth starting in truly cold weather (below 40°F).
Related Fault Codes
P0112 often appears with P0113 (IAT sensor high input) in intermittent cases, or P0101 (MAF sensor performance) if the IAT is integrated with the MAF sensor.
Common Causes of P0112
Faulty IAT Sensor
The sensor’s thermistor shorts out (common in aging sensors exposed to heat, oil, or debris). A shorted thermistor sends a permanent low voltage signal (<0.5V), triggering P0112. This is the #1 cause in vehicles over 5 years old.
Damaged Wiring/Connectors
Frayed wires or corroded pins in the IAT circuit create a short. For example, a wire touching the vehicle’s metal frame (ground) drops the signal voltage to near 0V. Connectors often corrode from moisture or oil leaks.
Water Intrusion
Moisture in the IAT sensor connector (from heavy rain, car washes, or coolant leaks) causes electrical shorts. Water conducts electricity, bypassing the thermistor and lowering the signal voltage.
MAF Sensor Issues
If the IAT is integrated with the MAF sensor (common in GM, Ford, and Toyota), a failing MAF can disrupt the IAT signal. The MAF’s internal circuits short, pulling the IAT voltage down with it.
ECM Malfunction (Rare)
The ECM’s voltage regulator fails, sending incorrect power to the IAT circuit. This is only likely after ruling out all other causes—e.g., sensor, wiring, and MAF are all functional.
Why iCarsoft CR MAX BT Excels at P0112
P0112 requires precise analysis of temperature and voltage signals—areas where basic scanners fall short. The CR MAX BT’s features are tailored to solve these challenges, making it the ideal tool for DIYers and technicians alike.
Step-by-Step: Diagnose P0112 with iCarsoft CR MAX BT
Follow this structured process to pinpoint the root cause of P0112. The CR MAX BT eliminates guesswork, ensuring you fix the real issue—not just the code.
-
1. Connect the CR MAX BT & Confirm P0112
-
Plug the CR MAX BT’s OBD-II adapter into your vehicle’s port (under the dashboard). Power on the tool, enable Bluetooth, and pair it with the adapter (follow on-screen prompts—takes 10 seconds).
-
Select your vehicle’s make/model/year, or use Auto VIN to auto-detect details (e.g., 2019 Chevrolet Silverado 5.3L). This ensures you get vehicle-specific IAT specs.
-
Navigate to Engine > Fault Codes > Read Codes to confirm P0112 is present. Tap Code Details for manufacturer-specific triggers (e.g., “Honda: IAT Voltage <0.4V for 5 Consecutive Seconds”).
-
Check for related codes (e.g., P0113, P0101)—these provide context (e.g., P0101 suggests a MAF-IAT integration issue).
-
2. Analyze Real-Time IAT Data
-
Go to Engine > Live Data > Air Intake and select these 3 critical parameters (use “Add to Favorites” to track them side-by-side):
-
“IAT Sensor Voltage” (target range: 0.5V–4.5V, varies with temperature)
-
“IAT Sensor Temperature” (calculated by ECM from voltage—should match ambient temp ±10°F)
-
“Ambient Air Temperature” (from the vehicle’s external temp sensor—for comparison)
-
Start the engine and let it idle for 5 minutes. Monitor the data:
-
P0112 Confirmation: Voltage stays <0.5V, and “IAT Sensor Temperature” reads implausibly high (e.g., 180°F when ambient temp is 70°F)—signals a shorted sensor or circuit.
-
Intermittent Issue: Voltage fluctuates between <0.5V and normal (e.g., 2.0V)—points to a loose connector or intermittent short (check wiring in Step 4).
-
MAF Integration Clue: If IAT is part of the MAF, “MAF Air Flow Rate” also reads abnormally low—confirms a MAF-IAT combo fault.
-
3. Locate & Inspect the IAT Sensor
-
Use the CR MAX BT’s Component Location tool to find the IAT sensor—location varies by vehicle:
-
Integrated with MAF: Common in GM, Ford, Toyota—sensor is part of the MAF unit in the air intake tube (4–6 pin connector).
-
Standalone in Intake Manifold: Typical in older models (e.g., 2005 Nissan Altima)—small 2-pin sensor screwed into the intake manifold.
-
In Air Filter Box: Rare, but found in some Chrysler/Dodge models—mounted inside the air filter housing.
-
Visually inspect the sensor and its connector:
-
Check for physical damage: cracks in the sensor housing, bent connector pins, or oil/debris buildup on the thermistor tip.
-
Inspect for corrosion: green/white deposits on connector pins (sign of moisture intrusion) or frayed wires near the connector.
-
Ensure the connector is fully seated—loose connections cause intermittent low voltage.
-
4. Test the IAT Sensor with CR MAX BT’s Multimeter
-
Step 1: Disconnect the Sensor — Turn off the engine, disconnect the IAT sensor’s electrical connector, and reference the CR MAX BT’s Wiring Diagram to identify pin functions (e.g., “Pin 1 = Signal, Pin 2 = Ground”).
-
Step 2: Check Thermistor Resistance:
-
Set the CR MAX BT to “Ohms” mode. Connect one probe to the sensor’s signal pin and the other to its ground pin.
-
Compare the reading to the tool’s vehicle-specific specs (e.g., 2,000Ω at 77°F, 1,000Ω at 122°F).
-
Reading <500Ω: Shorted thermistor—sensor is faulty, needs replacement.
-
Reading >10,000Ω: Open thermistor (unlikely for P0112, but indicates a different sensor issue).
-
Step 3: Test Circuit Voltage:
-
Reconnect the sensor’s connector. Turn the ignition to “On” (engine off) and set the CR MAX BT to “DC Voltage.”
-
Carefully probe the signal wire at the connector (use a backprobe to avoid damaging pins)—voltage should read ~5V (ECM reference voltage) when the sensor is cold.
-
No voltage or <1V: Check for a broken wire or blown fuse. Use the CR MAX BT’s Fuse Location feature to find the “IAT/MAF” fuse (usually 7.5A–10A) in the engine bay fuse box.
-
5. Repair or Replace Components
-
If Sensor Is Dirty/Contaminated:
-
Remove the sensor (use the CR MAX BT’s Removal Guide for torque specs—e.g., 8 ft-lbs for standalone sensors).
-
Clean the thermistor tip with electrical contact cleaner (avoid water or harsh solvents). Wipe away oil/debris with a lint-free cloth.
-
Reinstall the sensor and reconnect the connector. Let it dry for 5 minutes before testing.
-
If Sensor Is Faulty:
-
Use the CR MAX BT’s Part Lookup to find the OEM replacement (e.g., Bosch 0280130031 for European models, Denso 23831-22010 for Toyotas).
-
Install the new sensor, ensuring the connector is fully seated. Avoid over-tightening standalone sensors—this cracks the intake manifold.
-
If Wiring/Connectors Are Damaged:
-
Repair frayed wires with heat-shrink tubing (match wire gauge: usually 18–20 AWG).
-
Clean corroded connectors with a wire brush and electrical contact cleaner. Apply dielectric grease to pins to repel moisture.
-
Replace severely damaged connectors (use OEM parts for compatibility).
-
If MAF-IAT Integration Is Faulty:
-
Test the MAF sensor with the CR MAX BT’s MAF Performance Test (under Special Functions > Engine).
-
Replace the MAF unit if tests fail—most integrated MAF-IAT sensors can’t be repaired separately.
-
6. Clear P0112 & Verify Repairs
-
Step 1: Clear the Code — Navigate to Engine > Fault Codes > Clear Codes and select P0112. Confirm deletion—old codes may interfere with verification.
-
Step 2: Test Drive & Monitor Data:
-
Take a 20-minute test drive, including both city (stop-and-go) and highway (steady speed) driving.
-
Use the CR MAX BT’s Data Logging to record IAT voltage and temperature. Ensure:
-
Voltage stays within 0.5V–4.5V (rises with temperature).
-
IAT sensor temperature matches ambient temperature ±10°F.
-
No hesitation, rough idle, or misfires during driving.
-
Step 3: Re-Scan for Codes:
-
After the test drive, return to the CR MAX BT’s fault code menu and perform a re-scan.
-
No P0112 + stable IAT data = Repair is successful.
-
Codes return: Double-check for hidden issues (e.g., a loose wire under the intake manifold) or use the CR MAX BT’s ECM Health Check to rule out ECM faults.
Pro Tip for Integrated MAF-IAT Sensors: When replacing a MAF unit with a built-in IAT, use the CR MAX BT’s MAF/IAT Relearn function (under Special Functions > Engine). This syncs the new sensor’s data with the ECM—skip it, and P0112 may return within days.
How to Prevent P0112 from Recurring
The CR MAX BT helps you maintain a healthy IAT system, avoiding future P0112 codes with proactive care.
-
1. Monthly IAT Sensor Checks
-
Use the CR MAX BT’s Air Intake Health Scan (under Quick Tests) to monitor IAT voltage and resistance. Set reminders via the tool’s “Service Schedule” feature.
-
Early warning signs: Voltage stays <1.0V in 70°F+ weather, or resistance is 50% below specs—indicates a failing sensor.
-
2. Protect Against Moisture
-
Apply dielectric grease to the IAT sensor connector after every repair or oil change. Grease creates a waterproof seal, preventing water intrusion.
-
Avoid high-pressure washing directly on the air intake system—water can force its way into the sensor connector.
-
3. Clean or Replace the Air Filter Regularly
-
A dirty air filter allows dust, debris, and oil to reach the IAT sensor, accelerating wear. Use the CR MAX BT’s Maintenance Reminder to replace the filter every 15,000–30,000 miles (or 1 year).
-
For high-mileage vehicles, check the filter every 5,000 miles—off-road or dusty driving clogs filters faster.
-
4. Fix Oil/Coolant Leaks Promptly
-
Oil leaks from the valve cover gasket or coolant leaks from the intake manifold can drip onto the IAT sensor, damaging the thermistor. Use the CR MAX BT’s Live Data to monitor engine oil level and coolant temperature—unusual drops signal leaks.
-
5. Update ECM Software Annually
-
Use the CR MAX BT’s One-Key Upgrade to install manufacturer ECM patches. Some P0112 cases are caused by outdated sensor calibration—updates fix voltage threshold settings.
-
Check for updates every 6 months—the tool alerts you to new releases for your vehicle.
FAQ: Common Questions About P0112
Q: Can I drive my vehicle with P0112, or will it cause damage?
A: Short-term driving (1–2 weeks) is possible, but long-term use risks damage:
-
Over-fueling leads to carbon buildup on spark plugs and the catalytic converter (costing $800–$1,500 to replace).
-
Rough idle strains engine mounts, causing premature wear.
-
In cold weather, misfires can damage the cylinder walls over time.
Fix P0112 as soon as possible to avoid costly repairs.
Q: Why does P0112 come back after I replace the sensor?
A: The most common reasons are
unaddressed wiring issues or
MAF integration problems:
-
You replaced the sensor but didn’t fix a shorted wire—current still bypasses the thermistor, triggering P0112.
-
The IAT is integrated with the MAF, and the MAF is faulty—replacing just the IAT (if possible) won’t solve the issue.
-
You skipped the MAF/IAT relearn (for integrated sensors)—the ECM doesn’t recognize the new sensor’s signal.
Use the CR MAX BT’s circuit test to check for hidden shorts.
Q: Is the IAT sensor the same as the ambient air temperature sensor?
A: No—they’re two distinct sensors with different roles:
-
IAT Sensor: Measures temperature of air entering the engine (mounted in the intake system). Critical for fuel injection timing.
-
Ambient Air Temperature Sensor: Measures temperature of air outside the vehicle (mounted in the front bumper). Used for the HVAC system and dashboard temp display.
A faulty ambient sensor won’t trigger P0112—but the CR MAX BT monitors both to help you compare readings.
Q: Can I clean the IAT sensor instead of replacing it?
A: Yes—if the issue is
contamination (oil/debris), not a faulty thermistor:
-
Use electrical contact cleaner (not throttle body cleaner) to avoid damaging the thermistor.
-
Cleaning works best for sensors with visible debris but normal resistance readings (e.g., 2kΩ at 77°F).
-
If resistance is <500Ω (shorted), cleaning won’t help—replace the sensor.
The CR MAX BT’s resistance test tells you if cleaning is worth trying.
Summary Table: P0112 Diagnosis & Repair Steps
|
Step
|
Action with iCarsoft CR MAX BT
|
Common Fix
|
|
1
|
Scan Engine system; confirm P0112 + check related codes
|
Identify IAT circuit low-input issue
|
|
2
|
Monitor live IAT voltage/temperature vs. ambient temp
|
Confirm shorted sensor or circuit fault
|
|
3
|
Locate sensor via Component Location; inspect for damage
|
Clean contaminated sensor or connector
|
|
4
|
Test sensor resistance + circuit voltage with built-in multimeter
|
Replace shorted sensor or repair wiring
|
|
5
|
Clear code; run MAF/IAT relearn (if integrated)
|
Sync new sensor data with ECM
|
|
6
|
Log data during test drive; re-scan for codes
|
Verify stable IAT readings + no recurring P0112
|
Final Thoughts
P0112 might seem like a minor sensor issue, but it disrupts your engine’s core air-fuel balance—hurting performance, wasting fuel, and risking long-term damage. The iCarsoft CR MAX BT simplifies diagnosis with its wireless convenience, real-time data, and vehicle-specific tools, helping you avoid costly guesswork (e.g., replacing a MAF when the issue is just a frayed wire).
Whether you’re a DIYer fixing a family car or a technician troubleshooting a fleet, the CR MAX BT ensures you resolve P0112 quickly and correctly. Its resistance testing, circuit diagnostics, and relearn functions turn a potentially confusing code into a straightforward repair.
Don’t let a small sensor compromise your drive. With the CR MAX BT, you have everything you need to fix P0112 with confidence—and keep your engine running at its most efficient for miles to come.